

18 - Creating my own FREE and POWERFUL backup solution
18 - Creating my own FREE and POWERFUL backup solution

Today’s topic is dry, but I think it’s an important one — keeping your files and projects on a regular backup. It’s easy to lose everything with just one mishap on your PC. Poof! Your important files and projects are gone and unrecoverable!
I can seriously geek out on these little projects and go down rabbit holes lasting days if not weeks. Over a span of three weeks this April I experimented and figured out my own solution and will explain the journey here.
A disclaimer that I’m an amateur scripter and do it as an occasional hobby. This project was a learning process for me. I’m sure there is an army of developers out there that would suggest more robust solutions using Python, Rust, or who knows what (and please feel free to comment your ideas!). In this case, I wanted to use simple tools available to me and keep everything low overhead as possible.
Let’s get started.
Finding a solution
I’ve looked at many different backup options. Some wanted to charge monthly or annual fees. Some lacked the features I was looking for or had mediocre performance. Some tools, while free, appeared to have not been regularly updated or maintained.
I first used a tool Duplicacy for a few years. I even paid $30 for a three-year license for their GUI front-end because the free command line tool was confusing to me. Over time I became frustrated with how it worked. I eventually figured out the command line tool and I didn’t like how it structured the backup and it seemed very counter-intuitive to me.
I needed a solution that meet the following criteria:
Powerful and flexible yet understandable method to handle the different scenarios that I wanted and have it available on different operating systems if I switched from Windows
Free and actively maintained tools with a proven history and community
Automation that I could set and forget it
After a lot of trial and error I produced a solution that works for me, and I will share it here. I’m using a combination of free tools and I made a shell script to package it all together.
Resticto make encrypted, deduplicated, and compressed snapshots of my personal files to my external driveRobocopyto make a quick unencrypted copy of my book collection to my external driveRcloneto save a copy of the above backups to a cloud so I have them in a second location in case my external drive fails or is lostWindows task scheduler to run my script each morning
Here’s the Windows PowerShell script I made and will explain how it works.
# Restic environment variables
$env:RESTIC_REPOSITORY = "E:\restic"
$env:RESTIC_PASSWORD_FILE = "$env:WINDIR\restic\PW.txt"

# Path variables
$LOG = "$env:WINDIR\restic\backup.log"
$LIST = "$env:WINDIR\restic\LIST.txt"
$CALIBRE = "$env:USERPROFILE\Calibre Library"

# Set up flag to track whether an error has occurred
$errorOccurred = $false

# Start transcript to capture all console output in the log file
Start-Transcript -Path $LOG -UseMinimalHeader -Force

try {
    "`nCreating backup..."
    restic backup --files-from $LIST 2>&1 | Out-Default || & {throw}

    "`nApplying retention policy..."
    restic forget --keep-daily 7 --keep-weekly 5 --keep-monthly 12 --prune 2>&1 | Out-Default || & {throw}

    "`nChecking repo..."
    restic check 2>&1 | Out-Default || & {throw}

    "`nCopying repo to Onedrive..."
    rclone sync "E:\restic" onedrivedev:restic -P 2>&1 | Out-Default || & {throw}

    "`nDone."
}
catch {
    # Handle errors from Restic commands
    "`nRestic backup failed. Attempting Calibre backup..."
    $errorOccurred = $true
}

# Calibre backup commands
try {

    "`nBacking up Calibre..."
    robocopy $CALIBRE "E:\Calibre Library" /mir /nfl /ndl 2>&1 | Out-Default || & {throw}

    # Check if it's Saturday for OneDrive sync of Calibre
    if ((Get-Date).DayOfWeek -eq 'Saturday') {
        "`nBacking up Calibre to Onedrive..."
        rclone sync $CALIBRE onedrivedev:calibre -P 2>&1 | Out-Default || & {throw}
    }

    "`nDone."
}
catch {
    # Handle errors from Calibre backup commands
    "`nCalibre backup failed."
    $errorOccurred = $true
}

finally {
    # Stop transcript to end capture of console output in the log file
    Stop-Transcript

    # Invoke log if an error occurred
    if ($errorOccurred) {
        Invoke-Item $LOG
    }
}
Environment Variables
The first part sets up two environment variables built-in with restic about where my repository for backups is saved and where the password file is saved.
# Restic environment variables
$env:RESTIC_REPOSITORY = "E:\restic"
$env:RESTIC_PASSWORD_FILE = "$env:WINDIR\restic\PW.txt"
With restic you first need to initialize the repo. This just means you need to run a quick command with restic to get your repo set up. This step needs to be done before utilizing the script.
restic init --repo [choose you repo location]You will choose a password for your repo at this point. Be sure you don’t lose it because it’s the only way you can unencrypt and access it later! Once it’s initialized you can easily reference it by assigning the location to the variable RESTIC_REPOSITORY.
Then I used a separate TXT file in an admin rights folder to save my restic password so the script will pass it through, and the script doesn’t have to ask me to input it each time. That file is assigned to RESTIC_PASSWORD_FILE as shown above.
Script variables
I created three of my own variables to reference in the rest of the script. These are not variables associated with any of the programs and are specific only to this script.
# Path variables
$LOG = "$env:WINDIR\restic\backup.log"
$LIST = "$env:WINDIR\restic\LIST.txt"
$CALIBRE = "$env:USERPROFILE\Calibre Library"
$LOG is a plain text file that I want to output messages in case I want to review.
$LIST is another text file with a list of all the directories I want in my restic backup. This is one of my favorite features of restic because it lets me select which directories to save and will ignore others that I don’t find important and saves space.
$CALIBRE is just points to my personal book collection location. If you want to know more about Calibre see my previous newsletter here.
You may be wondering what WINDIR and USERPROFILE are. Those are location shortcuts in Windows pointing to C:\Windows and C:\[Your User Name] respectively. I like using those location shorthand names whenever possible. One nuance to keep in mind — with command lines you use percentage signs like %WINDIR% whereas in PowerShell you use $env: such as $env:WINDIR.
This is a good point to set up a PATH environment variable to your folder containing the restic and rclone executables. I recommend putting them in a separate folder and adding the location to your user path so you can call those commands easily from any location you want. I won’t share the step by step here but here’s a good guide on it from Architect Ryan. In my case I chose to add a PATH to %WINDIR%\restic on my PC.
Creating a transcript
Two more steps before we get to the meat and potatoes. The first is setting up an error flag variable that will be used later and starting a transcript which calls a PowerShell command to log all output.
# Set up flag to track whether an error has occurred
$errorOccurred = $false

# Start transcript to capture all console output in the log file
Start-Transcript -Path $LOG -UseMinimalHeader -Force
I used the minimal header flag because of personal preference and the force flag so it creates the log no matter what. I set the path to my $LOG variable as described earlier.
restic and rclone try-catch
Now we get to the actual action. With PowerShell I set up a try-catch block so it will stop at an error and notify me so I can review and intervene.
The parts in quotes like "`nCreating backup..." are simple echo statements to tell me which stage the script is at. The `n means that I want a new line before the statement is written. This makes it easier to read the log file.
try {
    "`nCreating backup..."
    restic backup --files-from $LIST 2>&1 | Out-Default || & {throw}

    "`nApplying retention policy..."
    restic forget --keep-daily 7 --keep-weekly 5 --keep-monthly 12 --prune 2>&1 | Out-Default || & {throw}

    "`nChecking repo..."
    restic check 2>&1 | Out-Default || & {throw}

    "`nCopying repo to Onedrive..."
    rclone sync "E:\restic" onedrivedev:restic -P 2>&1 | Out-Default || & {throw}

    "`nDone."
}
catch {
    # Handle errors from Restic commands
    "`nRestic backup failed. Attempting Calibre backup..."
    $errorOccurred = $true
}
The actual tool commands are straight forward. The first one is telling restic to make a backup snapshot based on the directory list set up earlier. You don’t have to specify the repo location because we set the environment variable earlier too.
restic backup --files-from $LISTNext is a restic retention policy and clean up command. Keeping daily snapshots for each day wouldn’t be an efficient storage. Here I’m telling restic to keep 7 of the past daily copies, one copy for the past five weeks, and one copy for the past 12 months. In total I don’t want more than 24 snapshots. The —prune flag tells restic that it can remove the snapshots that are not included in the retention policy described.
restic forget --keep-daily 7 --keep-weekly 5 --keep-monthly 12 --pruneThe third and last restic command checks for any errors or issues with the snapshots
restic checkThe last command of this try block is using rclone to make a copy of the restic repo onto the cloud. Like the initialize we did with restic above, you’ll need to do a similar config setup with rclone. The instructions depend on what cloud you’re choosing and go beyond the scope of this already long newsletter, but you can find the details in the manual. It’s easy actually and doesn’t take more than five or so minutes.
In this line I’m having rclone synchronize my external drive restic repository onto a OneDrive folder also called restic. The -P is an optional flag to output progress so I can see on the log what was done.
rclone sync "E:\restic" onedrivedev:restic -PNow we have the catch block to notify me if something went wrong with any of the above commands. In this catch I simply switch the error variable to true because there are other parts of the script I want to run next.
catch {
    # Handle errors from Restic commands
    "`nRestic backup failed. Attempting Calibre backup..."
    $errorOccurred = $true
}
Calibre try-catch
I now have a second try-catch block that’s dedicated to my library collection. I don’t need to use restic on it because it’d be overkill. I just need a simple copy done.
# Calibre backup commands
try {

    "`nBacking up Calibre..."
    robocopy $CALIBRE "E:\Calibre Library" /mir /nfl /ndl 2>&1 | Out-Default || & {throw}

    # Check if it's Saturday for OneDrive sync of Calibre
    if ((Get-Date).DayOfWeek -eq 'Saturday') {
        "`nBacking up Calibre to Onedrive..."
        routputing $CALIBRE onedrivedev:calibre -P 2>&1 | Out-Default || & {throw}
    }

    "`nDone."
}
catch {
    # Handle errors from Calibre backup commands
    "`nCalibre backup failed."
    $errorOccurred = $true
}
The first command is using a Windows utility robocopy to quickly mirror my Calibre library to my external drive. You could use rclone to achieve something similar, but I found robocopy to be much faster. The /mir flag tells it to mirror my library to a specific location on my external drive. The /nfl and /ndl flags tell it to not bother outputting a listing of all the files and directories. I don’t need those captured in my log file.
robocopy $CALIBRE "E:\Calibre Library" /mir /nfl /ndlNext, I wanted a weekly copy of the Calibre library onto the cloud and used a simple if-then to check. Again, I’m using the rclone sync command to make the copy into a OneDrive folder called “calibre”. I only do this once a week because I don’t need daily synchronization and it’s a little slow because it takes up to 10 minutes or more each time it’s run.
if ((Get-Date).DayOfWeek -eq 'Saturday') {
      "`nBacking up Calibre to Onedrive..."
       rclone sync $CALIBRE onedrivedev:calibre -P
}
Again, I have a catch block to set the error variable to true if an error is thrown.
catch {
    # Handle errors from Calibre backup commands
    "`nCalibre backup failed."
    $errorOccurred = $true
}
Warning: Nerd Territory
You may notice 2>&1 | Out-Default || & {throw} appended after each command here. This part is cryptic but a necessary part to capture outputs into the log file and to stop the script at non-terminating errors. This took me days to figure this part out and I will explain what it does.
2>&1 is a redirection command line flag telling it that I want any output, either standard or error, to be captured. The pipe symbol | means I want it to use both the redirection and the Out-Default command after it.
Out-Default is a PowerShell command that I had to use for the transcript Start-Transcript cmdlet work correctly. Without this command, the script would mysteriously miss parts of the output from the log file.
Finally, the double pipe command || & {throw} says that if anything before this command fails, I want it to throw an error and get captured. This was necessary even when using a catch block because the command line errors from restic and rclone are usually non-terminating errors. Throwing an error manually is a hacky way to get this to stop as I wanted it to. Keep in mind & {throw} must be added exactly that way. Missing the ampersand or the curly brackets will NOT work in the PowerShell script.
As a side note, I find having to append this after each command as ugly and inelegant solution but eventually accepted it as a wonky workaround required to make this script work as I wanted. A PowerShell function to handle it could be an alternative. The few versions I tried during my development of this script didn’t appeal or make sense to me and I stayed with this option instead.
Ending the transcript and invoking the log if there’s an error
Lastly, we have the finally block where it ends the PowerShell transcription and opens the log file if the error occurred variable was switched to true at any time. This way the log file is immediately put before me so I can investigate what went wrong.
finally {
    # Stop transcript to end capture of console output in the log file
    Stop-Transcript

    # Invoke log if an error occurred
    if ($errorOccurred) {
        Invoke-Item $LOG
    }
}
Automating it with Windows Task Scheduler
There’re a ton of guides online on how to run scripts on a regular basis with Task Scheduler. Use your favorite search engine to find a guide that you like. I’ll briefly describe how I did mine.
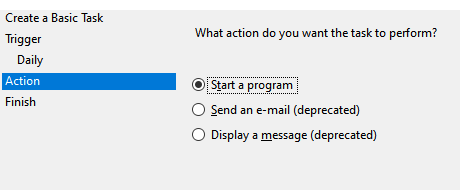
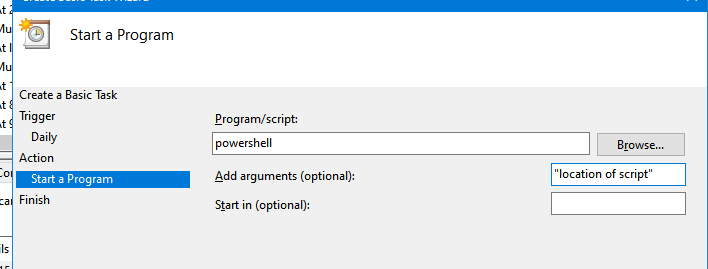
I created a basic task to run daily at 6:30 AM.


I have it start the PowerShell program and added the script location in quotes as the argument.

I go into the properties of the new task, go to the Security Options in the General tab, and turn on two things
Run whether use is logged on or not. This will allow the backup to take place even if I’m away.
Run with the highest privileges. This will make sure the script runs and it’s required if you’re using an admin rights protected folder like I am (the C:\Windows directory).

Go into the Settings tab and check Run task as soon as possible after a scheduled start is missed to ensure a backup takes place daily

Bonus step — You can adjust your PC bios to turn on daily at a set time. I have mine turn on my PC at 6 AM so I know it’s active before the script starts.
Restoring a backup snapshot
If I ever need to restore a snapshot with Restic, it’s an easy command to run. Optionally, you can use flags described in the linked documentation above to narrow down which files or directories of the snapshot to include so it only recovers what you’re interested in. In this example, I’m asking it to make a full restore of the latest snapshot made into a target location on my PC.
restic -r [location of repo] restore latest --target [target location]Solution for other operating systems
This guide used Windows tools like PowerShell and Task Scheduler. While I have limited experience with Unix-like systems (Mac, Linux), I do think the above could be applied with some tweaking:
Using Bash instead of PowerShell
Finding an alternative utility for
RobocopyUsing
crontabinstead of Windows Task SchedulerBorgcould be a suitable alternative toresticif you want to make that switch
Automatic tool updates
You could make another task scheduler to run a script with two self-update commands for restic and rclone. I made my schedule a monthly cadence.
restic self-update
rclone selfupdate
Sources
Using AI
I heavily used ChatGPT during this discovery process and collaborated with it to produce the script above. My feelings are mixed on the experience. It often made suggestions that were completely wrong such as telling me to use non-existing command flags or putting pieces of code in wrong places.
AI is a double-edged sword. You need some of your own technical knowledge and skills to differentiate between the good and the bad ideas it suggests. I often found myself going back to documentation on PowerShell to double check things.
I plan to continue using ChatGPT while taking it with a large grain of salt.
Are you still here?
This was the longest public post I’ve ever done. If you read all of this or it helped you in any way, you deserve a gold star!